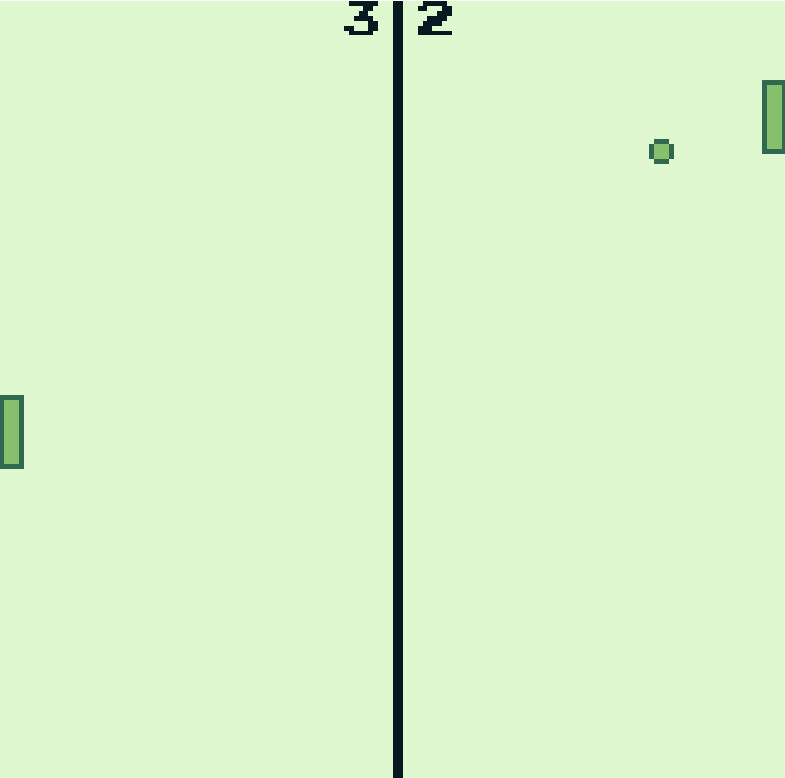
WASM-4 是一款使用 WebAssembly 实现的复古风格游戏机。凹语言作为国内首个面向 WebAssembly 设计的通用编程语言在 syscall/wasm4 内置标准库对 WASM4 平台提供了支持,从而为使用凹语言开发小游戏的用户提供最佳体验。
我们以一个简单的乒乓球游戏作为例子,看看如何开发 WASM4 游戏。

配置环境
安装凹语言 v0.15 以上的版本,或者通过以下 Go 命令安装最新的 wa 命令行:
$ go install wa-lang.org/wa@master
然后通过以下命令创建一个 hello 新目录工程:
$ wa init -wasm4
$ tree hello/
hello/
├── README.md
├── src
│   └── main.wa
└── wa.mod

2 directories, 3 files
命令行环境进入 hello 目录后,输入wa run可以在浏览器打开查看效果。
程序整体骨架
直接修改src/main.wa文件:
import (
	"math/rand"
	"strconv"
	"syscall/wasm4"
)

const (
	width  = 5
	height = 15

	ballSize   = 5
	screenSize = int(wasm4.SCREEN_SIZE)
)

// 玩家 1(右边): 上下方向键
// 玩家 2(左边): ED 键对应上下键, 左右方向键盘控制

global game = NewPongGame(true) // 双人游戏

#wa:export update
func Update {
	game.Input()
	game.Update()
	game.Draw()
}
Update 函数会以每秒 60 帧的频率被调用,其中分布出来游戏的输入、更新游戏状态并显示。
定义游戏对象
在对象中保存的游戏状态:
// 游戏的状态
type PongGame :struct {
	isMultiplayer: bool // 多人游戏
	ballX:         int  // 球的水平位置
	ballY:         int  // 球的竖直位置
	dirX:          int  // 球的方向
	dirY:          int  // 球的方向
	y1:            int  // 左边挡板位置
	y2:            int  // 右边挡板位置
	score1:        int  // 玩家分数
	score2:        int  // 玩家分数
}

// 构建一个新游戏对象
func NewPongGame(enableMultiplayer: bool) => *PongGame {
	return &PongGame{
		isMultiplayer: enableMultiplayer,
		ballX:         screenSize / 2,
		ballY:         screenSize / 2,
		dirX:          1,
		dirY:          1,
		y1:            screenSize / 2,
		y2:            screenSize / 2,
		score1:        0,
		score2:        0,
	}
}
主要是乒乓球、挡板等位置和方向信息。
处理输入键
通过不同方向键盘分别控制 2 个挡板的移动。
func PongGame.Input {
	// 第 1 个玩家
	if pad := wasm4.GetGamePad1(); pad&wasm4.BUTTON_UP != 0 && this.y1 > 0 {
		this.y1 -= 2
	} else if pad&wasm4.BUTTON_DOWN != 0 && this.y1+height < screenSize {
		this.y1 += 2
	}

	// 第 2 个玩家或机器人
	if this.isMultiplayer {
		// 左右方向键盘控制
		if pad := wasm4.GetGamePad1(); pad&wasm4.BUTTON_LEFT != 0 && this.y2 > 0 {
			this.y2 -= 2
		} else if pad&wasm4.BUTTON_RIGHT != 0 && this.y2+height < screenSize {
			this.y2 += 2
		}

		if pad := wasm4.GetGamePad2(); pad&wasm4.BUTTON_UP != 0 && this.y2 > 0 {
			this.y2 -= 2
		} else if pad&wasm4.BUTTON_DOWN != 0 && this.y2+height < screenSize {
			this.y2 += 2
		}
	} else {
		this.y2 = this.ballY // 自动对齐到接球位置(TODO: 失误机制)
	}
}
根据键盘更新挡板的位置信息。
更新游戏的状态
每秒钟 60 帧的速度更新状态:
func PongGame.Update {
	// 更新球的方向
	if dirNow := this.paddleCollision(); dirNow != 0 {
		wasm4.Tone(2000, 5, 100, wasm4.TONE_PULSE2|wasm4.TONE_MODE2)
		if rand.Int()%2 != 0 {
			this.dirX = dirNow
			this.dirY = -1
		} else {
			this.dirX = dirNow
			this.dirY = 1
		}
	}

	// 更新球的位置
	this.ballX += this.dirX
	this.ballY += this.dirY

	// 检查球是否反弹
	if this.ballY > screenSize || this.ballY < 0 {
		wasm4.Tone(2000, 5, 100, wasm4.TONE_PULSE2|wasm4.TONE_MODE2)
		this.dirY = -this.dirY
	}

	// 判断得分
	if this.ballX <= 0 || this.ballX > screenSize {
		wasm4.Tone(1000, 5, 100, wasm4.TONE_PULSE2|wasm4.TONE_MODE2)

		if this.ballX <= 0 { // 左边玩家失球
			this.score2 += 1
		} else if this.ballX > screenSize {
			this.score1 += 1 // 右边玩家失球
		}

		// 重置球位置
		this.ballX = screenSize / 2
		this.ballY = screenSize / 2
		this.dirX = -this.dirX
	}
}
同时判断失球和得分情况。以下是碰撞判断:
func PongGame.paddleCollision => int {
	if this.ballX < width &&
		this.ballY < this.y2+height &&
		this.ballY+ballSize > this.y2 {
		return 1
	}
	if this.ballX+ballSize > screenSize-width &&
		this.ballY < this.y1+height &&
		this.ballY+ballSize > this.y1 {
		return -1
	}
	return 0
}
球碰到和超出边界表示失球得分。
如何画乒乓球和挡板
WASM4 的调色板寄存器一次只能存储 4 种颜色,可以通过更改这一寄存器来引入新的颜色。以下是 WASM4 默认的配色表:

WASM4 内置的绘图函数不直接访问这个颜色表寄存器,而是访问同样能够存储 4 个颜色的 DRAW_COLORS 寄存器来指定对应的颜色表索引。可以通过wasm4.SetDrawColors函数完成。
绘制场景的代码:
func PongGame.Draw {
	wasm4.SetDrawColors(0, 4)
	wasm4.SetDrawColors(1, 0)
	wasm4.Text(strconv.Itoa(this.score1), 85, 0)
	wasm4.Text(strconv.Itoa(this.score2), 70, 0)
	wasm4.Rect(screenSize/2, 0, 2, screenSize)

	wasm4.SetDrawColors(0, 2)
	wasm4.SetDrawColors(1, 3)
	wasm4.Oval(this.ballX, this.ballY, ballSize, ballSize)
	wasm4.Rect(0, this.y2, width, height)
	wasm4.Rect(screenSize-width, this.y1, width, height)
}
到此乒乓球游戏就完成了。
完整代码
完整代码大约 150 行: https://github.com/wa-lang/wa/tree/master/waroot/examples/w4-pong
在线体验地址: https://wa-lang.org/wa/w4-pong/
如果你也是游戏爱好者,也可以试试用凹语言开发自己的游戏了。
1
Borch 83 天前
乍一看以为是 rust...
|
3
mightybruce 83 天前 回复有点少啊,支持一下凹语言, 毕竟是基于 go 开发出来的针对 wasm 的语言。
|
4
StoneKnocker 83 天前 哇, 想不到柴大的凹语言还在推进呢, 好几年了吧
|
5
chai2010 OP @StoneKnocker 2019 年初立项,2022 年 7 月开源,有几年了现在刚刚进到深水区。感谢支持
|